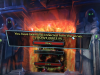
Ever since the release of Legion, many World of Warcraft players have been experiencing the WOW51900319 Disconnected Error. This piece will teach you different approaches to solving this problem.
Method 1: Make sure the Background FPS Option is Enabled and Locked unto 30fps.
You can change the Background FPS settings to 30fps by doing the following:
1. Launch the Game Menu by either clicking the Game Menu icon (red question mark on your bars) or pressing the ESC button, and click System.
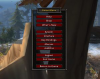
2. On the System Menu, click Advanced.
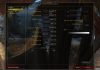
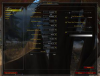
3. On the Advanced Options page, click the Max Background FPS checkbox and set it to 30 with the slider. Click Ok. I'm not sure if 30fps is enough, but it works fine for my 60Hz screen with vertical sync.
4. Go back to Dalaran and repeat the process of jumping onto the Eagle Handler flight path for the Hunter Class hall. Then switch back to the desktop.
Method 2: IP Release, Renew, and Flush DNS.
This method applies to Windows 8 and 10
From Control Panel, you can change the DNS settings on your Windows 10 by taking the following steps
1. Go to Control Panel. Click on Network and Internet. Click on the Network and Sharing Center tab.
2. Click on Change Adapter Settings on the left pane.
3. Right-click the network interface of the internet connection, then select properties.
4. From the list, select Internet Protocol Version 4 (TCP/Pv4).
5. Click the properties tab.
6. Click the option "Use the following DNS addresses."
7. Input your preferred and alternate DNS server addresses. You can input any DNS of choice here, including free DNS' like Google Public DNS and OpenDNS.
8. Google Public DNS addresses: 8.8.8.8 and 8.8.4.4 OpenDNS addresses: 208.67.222.222 and 208.67.220.220
9. Click the OK button.
10. Click Close to apply the new DNS settings to the adapter.
Once you complete this process, your PC will start using the new DNS settings immediately.
Method 4: Reset your Network (for Windows 10)
After troubleshooting your system without success, try to reset your network. To do this, go to Windows Setting by pressing the Windows+i button on the keyboard, or clicking Start and then Settings button. This will take you to the Windows Settings screen, then click “Network & Internet.”
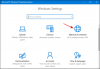
1. On the “Network & Internet” screen, click the "Status" tab on the left. Scroll down and click the "Network Reset" link on the right-hand side.
2. The "Network Reset" page shows a warning about the consequence of resetting your network, and also tells you a restart is required after the reset. Reset the network by clicking the "Reset now" button, and then reboot the system.
3. When the prompt to confirm network reset is displayed, click "Yes."
4. And that's all! After your system has rebooted, Windows will guide you through your network setup. This method should be the last option after every other method fails.
Searches related to WOW51900319
Method 1: Make sure the Background FPS Option is Enabled and Locked unto 30fps.
You can change the Background FPS settings to 30fps by doing the following:
1. Launch the Game Menu by either clicking the Game Menu icon (red question mark on your bars) or pressing the ESC button, and click System.
2. On the System Menu, click Advanced.
3. On the Advanced Options page, click the Max Background FPS checkbox and set it to 30 with the slider. Click Ok. I'm not sure if 30fps is enough, but it works fine for my 60Hz screen with vertical sync.
4. Go back to Dalaran and repeat the process of jumping onto the Eagle Handler flight path for the Hunter Class hall. Then switch back to the desktop.
Method 2: IP Release, Renew, and Flush DNS.
This method applies to Windows 8 and 10
- Press Windows key+X while on the desktop screen.
- Select Command Prompt (Run as Administrator)
- In the command prompt, type ipconfig /release.
- Wait for some seconds for a message informing you of the release of the IP address.
- In the command prompt, type ipconfig/renew.
- Wait for some seconds for a message informing you of the re-establishment of the IP address.
- In the command prompt, type ipconfig/flushdns.
- Leave the command prompt page, and try to establish a connection.
From Control Panel, you can change the DNS settings on your Windows 10 by taking the following steps
1. Go to Control Panel. Click on Network and Internet. Click on the Network and Sharing Center tab.
2. Click on Change Adapter Settings on the left pane.
3. Right-click the network interface of the internet connection, then select properties.
4. From the list, select Internet Protocol Version 4 (TCP/Pv4).
5. Click the properties tab.
6. Click the option "Use the following DNS addresses."
7. Input your preferred and alternate DNS server addresses. You can input any DNS of choice here, including free DNS' like Google Public DNS and OpenDNS.
8. Google Public DNS addresses: 8.8.8.8 and 8.8.4.4 OpenDNS addresses: 208.67.222.222 and 208.67.220.220
9. Click the OK button.
10. Click Close to apply the new DNS settings to the adapter.
Once you complete this process, your PC will start using the new DNS settings immediately.
Method 4: Reset your Network (for Windows 10)
After troubleshooting your system without success, try to reset your network. To do this, go to Windows Setting by pressing the Windows+i button on the keyboard, or clicking Start and then Settings button. This will take you to the Windows Settings screen, then click “Network & Internet.”
1. On the “Network & Internet” screen, click the "Status" tab on the left. Scroll down and click the "Network Reset" link on the right-hand side.
2. The "Network Reset" page shows a warning about the consequence of resetting your network, and also tells you a restart is required after the reset. Reset the network by clicking the "Reset now" button, and then reboot the system.
3. When the prompt to confirm network reset is displayed, click "Yes."
4. And that's all! After your system has rebooted, Windows will guide you through your network setup. This method should be the last option after every other method fails.
Searches related to WOW51900319
- error wow51900319
- wow51900319 legion
- world of warcraft wow51900319
- wow51900319 fix
- wow51900319 2017
- wow51900319 legion
- what does wow51900319 mean
- wow51900319 mac
- wow error 51900319 fix
- wow error 51900319 2017
- you have been disconnected from the server wow51900319