You are trying to beat a deadline. You have spent hours slugging it out at the keyboard and all of a sudden your screen goes blue! What comes to the mind of many people in this situation is the regret of not saving the file, or maybe the file is corrupted. Well, if the problem was due to a corrupted file, this piece will give you the solution to the problem.
To checkmate this issue, the most recent Windows 10 update came with a System File Checker. The System File Checker scans your files and lets you know of any corruption or changes in your system files. After checking for corrupted or modified files, Windows will replace the bad files with their original version. In case the System File Checker is unable to replace the file, you can recover the files with the DISM command. DISM, or Deployment Image and Servicing Management fix the component corruption that prevents the proper functioning of the System File Checker.

When to use these Options
You can use the System File Checker or DISM when:
The first choice is the System File Checker command because it will correct the majority of these issues. But if it does not fix the issue, it will prevent the corruption of your system files and allow you to try other options.
The DISM should always be used whenever the System File Checker fails to resolve the problem. Problems related to System File Checker are also connected to DISM, but DISM problems are less common. Running the DISM will fix any background issues that will prevent the checker from working correctly.
How do you run the System File Checker?
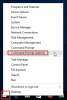
The System File Checker is run through the Administrator Command Prompt window. To access this, right-click on the Windows/Start button in the bottom left corner of your screen. Click "Command Prompt (Admin).
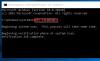
In the command interface, type ‘sfc/scannow’ and press Enter to run the application. Leave the application to run for about 5-10 minutes to identify any problems. If the checker could not find any problems, the interface will show this message ‘Windows Resource Protection did not find any integrity violations.'
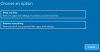
If the checker was able to locate the problem, it would display the message ‘Windows Resource Protection found corrupt files but was unable to fix some of them.' Then you will need to restart your system in safe mode. To reboot in safe mode, hold the shift key while clicking the restart option. This will bring you to the advanced boot options menu page. Once your system is rebooted, run the System File Checker application as described above, and you will get a message saying that no integrity violations were found.
If the checker fails again, then you should use the DISM Command.
Launch the Command Prompt (Administrator) as described above. In the command interface, type ‘DISM /Online /Cleanup-Image /RestoreHealth’.
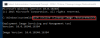
This process should also be allowed to run for 5-10 minutes. Initially, the progress bar might be slow, but let the command run. A message will pop up asking if a change has been made. If a change has been made, reboot your system and execute the System File Checker application. This time around, it should replace any corrupt files.
System Restore/Reset
In case the two methods above failed, the system restore can help restore your operating system to a later date when your files were in good condition.
To restore your system, click on the Start/Windows button at the bottom of the screen's left corner. In the search bar, type in System Restore. On the System Restore page, click ‘create a restore point’. In the system properties pop up, click on the System Restore tab. Enable the ‘turn on the system protection’ button and use the slider to move the Max Usage to about 5-10%. This value is the hard disk space you have allocated for system restore. Click on apply.
Another option is to reinstall Windows or reset your system. Doing this will delete all your apps and settings, but you can also keep your files. Start by going to Settings > Update & Security > Recovery (left pane) > Get Started. If you want to keep your files, select the ‘Keep My Files’ option or select the ‘Remove Everything’ option if you want to delete everything.
The ‘Remove Everything’ option takes a longer time to run, and if you click the ‘Remove files and clean the drive,' you might not be able to recover any data on the drive in future, but you can use the option if you won't be using the computer anymore. Next, click Next > Reset > Continue. This will reset Windows to its basic state and get rid of any corrupted files.
For problems relating to specific error messages, you can consult Microsoft's page on Windows 10 errors.
I hope you found some valuable information in this piece.
People also ask
To checkmate this issue, the most recent Windows 10 update came with a System File Checker. The System File Checker scans your files and lets you know of any corruption or changes in your system files. After checking for corrupted or modified files, Windows will replace the bad files with their original version. In case the System File Checker is unable to replace the file, you can recover the files with the DISM command. DISM, or Deployment Image and Servicing Management fix the component corruption that prevents the proper functioning of the System File Checker.
When to use these Options
You can use the System File Checker or DISM when:
- Your screen displays the Windows blue screen.
- Some Windows application is not running properly.
- Applications are crashing.
The first choice is the System File Checker command because it will correct the majority of these issues. But if it does not fix the issue, it will prevent the corruption of your system files and allow you to try other options.
The DISM should always be used whenever the System File Checker fails to resolve the problem. Problems related to System File Checker are also connected to DISM, but DISM problems are less common. Running the DISM will fix any background issues that will prevent the checker from working correctly.
How do you run the System File Checker?
The System File Checker is run through the Administrator Command Prompt window. To access this, right-click on the Windows/Start button in the bottom left corner of your screen. Click "Command Prompt (Admin).
In the command interface, type ‘sfc/scannow’ and press Enter to run the application. Leave the application to run for about 5-10 minutes to identify any problems. If the checker could not find any problems, the interface will show this message ‘Windows Resource Protection did not find any integrity violations.'
If the checker was able to locate the problem, it would display the message ‘Windows Resource Protection found corrupt files but was unable to fix some of them.' Then you will need to restart your system in safe mode. To reboot in safe mode, hold the shift key while clicking the restart option. This will bring you to the advanced boot options menu page. Once your system is rebooted, run the System File Checker application as described above, and you will get a message saying that no integrity violations were found.
If the checker fails again, then you should use the DISM Command.
Launch the Command Prompt (Administrator) as described above. In the command interface, type ‘DISM /Online /Cleanup-Image /RestoreHealth’.
This process should also be allowed to run for 5-10 minutes. Initially, the progress bar might be slow, but let the command run. A message will pop up asking if a change has been made. If a change has been made, reboot your system and execute the System File Checker application. This time around, it should replace any corrupt files.
System Restore/Reset
In case the two methods above failed, the system restore can help restore your operating system to a later date when your files were in good condition.
To restore your system, click on the Start/Windows button at the bottom of the screen's left corner. In the search bar, type in System Restore. On the System Restore page, click ‘create a restore point’. In the system properties pop up, click on the System Restore tab. Enable the ‘turn on the system protection’ button and use the slider to move the Max Usage to about 5-10%. This value is the hard disk space you have allocated for system restore. Click on apply.
Another option is to reinstall Windows or reset your system. Doing this will delete all your apps and settings, but you can also keep your files. Start by going to Settings > Update & Security > Recovery (left pane) > Get Started. If you want to keep your files, select the ‘Keep My Files’ option or select the ‘Remove Everything’ option if you want to delete everything.
The ‘Remove Everything’ option takes a longer time to run, and if you click the ‘Remove files and clean the drive,' you might not be able to recover any data on the drive in future, but you can use the option if you won't be using the computer anymore. Next, click Next > Reset > Continue. This will reset Windows to its basic state and get rid of any corrupted files.
For problems relating to specific error messages, you can consult Microsoft's page on Windows 10 errors.
I hope you found some valuable information in this piece.
People also ask
- How do I replace corrupted system files in Windows 7?
- How do I repair Windows 10?
- What is SFC Scannow Windows 10?
- How do I run SFC Scannow?
- windows resource protection found corrupt files but was unable to fix some of them windows 10
- how to fix corrupted files windows 7
- windows repair 10
- system file checker windows 10
- system file checker windows 7
- windows 7 startup repair command prompt chkdsk
- sfc /scannow windows resource protection could not perform the requested operation
- windows 10 dism